If you are a Samsung Galaxy S4 owner, you might have faced an issue with the SIM card. When you insert a SIM card into your phone, you will see no SIM card detect an error on your phone. Sometimes, you will notice a registered network error on your phone. There is some reason behind this error, one of the biggest reasons behind that is your SIM gets relocated. Try re-inserting it again and check if this has fixed your issue. Read the below article to find out the best possible methods to fix the No SIM card error or Samsung S4 SIM card error from your end.
How To Fix SIM Card Not Detected on Android
Solution 1: Enable or disable Airplane Mode
In the Android device, You can also solve this error by toggling Airplane mode. If you know that the sim card is not the problem for no sim card error, then try enabling or disabling airplane mode on your Android device to fix the no sim card error. Follow these simple steps to Toggle Airplane Mode
Airplane Mode Setting For Samsung Galaxy S4 (Directly)

Step 1: Pull down the Notification Bar on Galaxy S4
Step 2: Now swipe and find the Airplane icon
Step 3: Tap on “Airplane Mode” to enable
For Samsung Galaxy S4 (Manually)
Step 1: Open “Settings” on your Samsung Galaxy S4
Step 2: In the settings, look for the “More Networks” option
Step 3: In the “More Network” section, you can see the “Airplane mode” option
Here you can enable or disable Airplane mode on your Samsung Galaxy S4 device. If you own any other branded Android phone, you can also enable or disable airplane mode from the below steps.
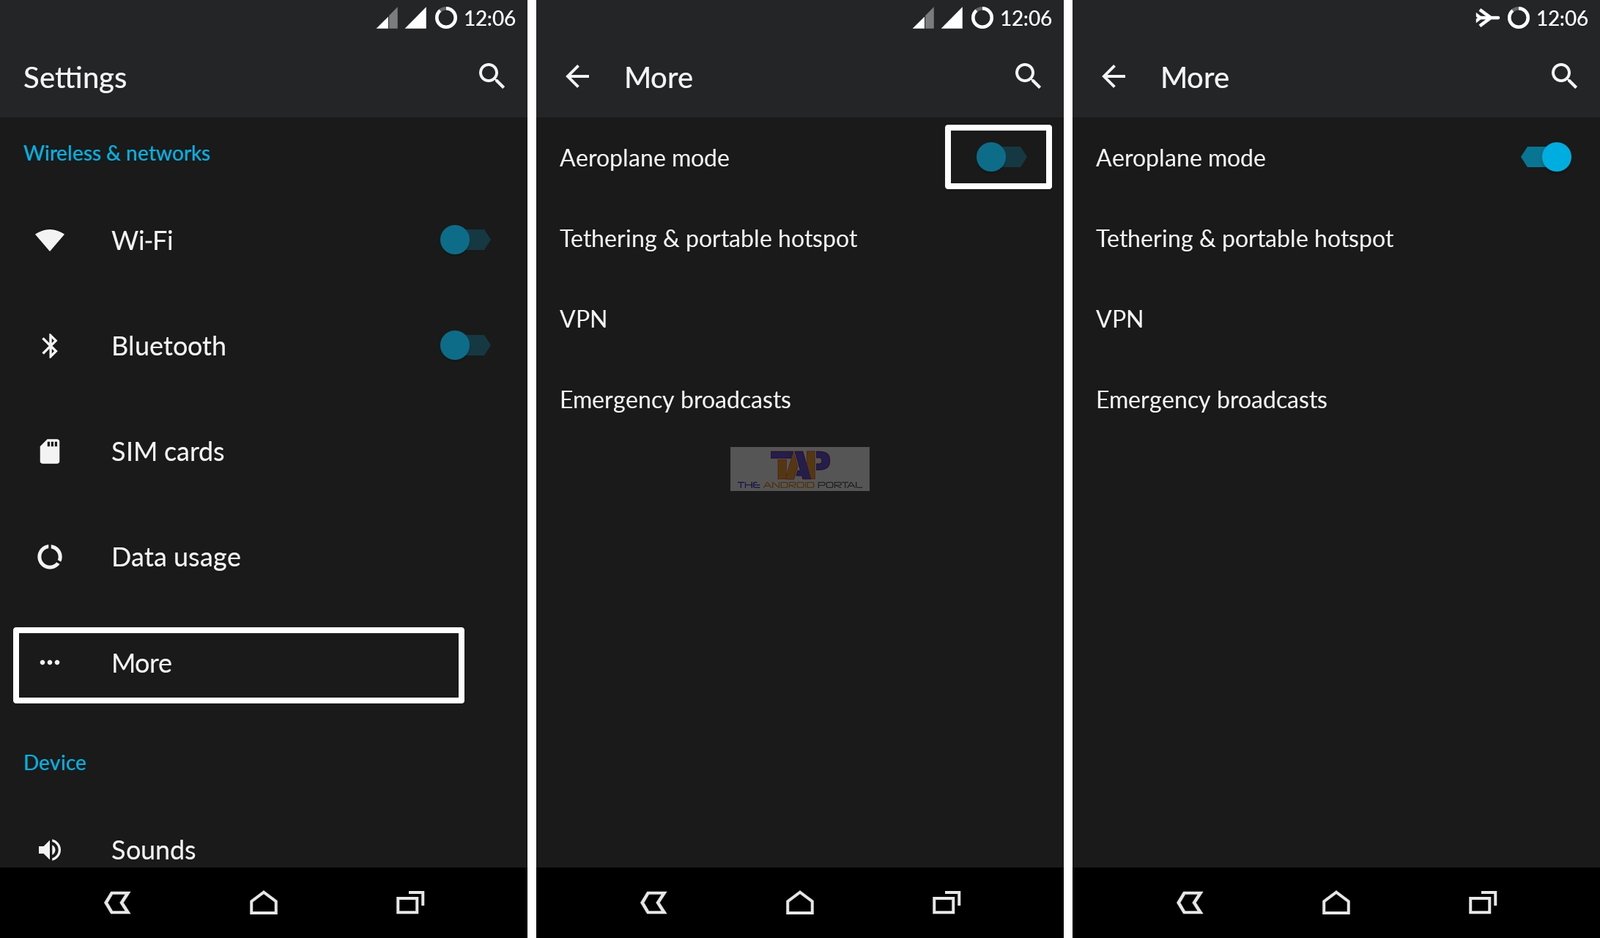
Airplane mode setting for any Android phones (Android OS 5.1)

Step 1: Open Settings app on Android device
Step 2: Scroll down and select “More” option
Step 3: In the More section, you can see the “Airplane mode” option
Here you can enable or disable Airplane mode via the Slider button. After enabling “Airplane mode” on your device, wait for 60 seconds then disable it again. Once the Airplane mode is disabled, your Android device will again try to search for Sim Network.
Solution 2: Set Network Mode to Auto
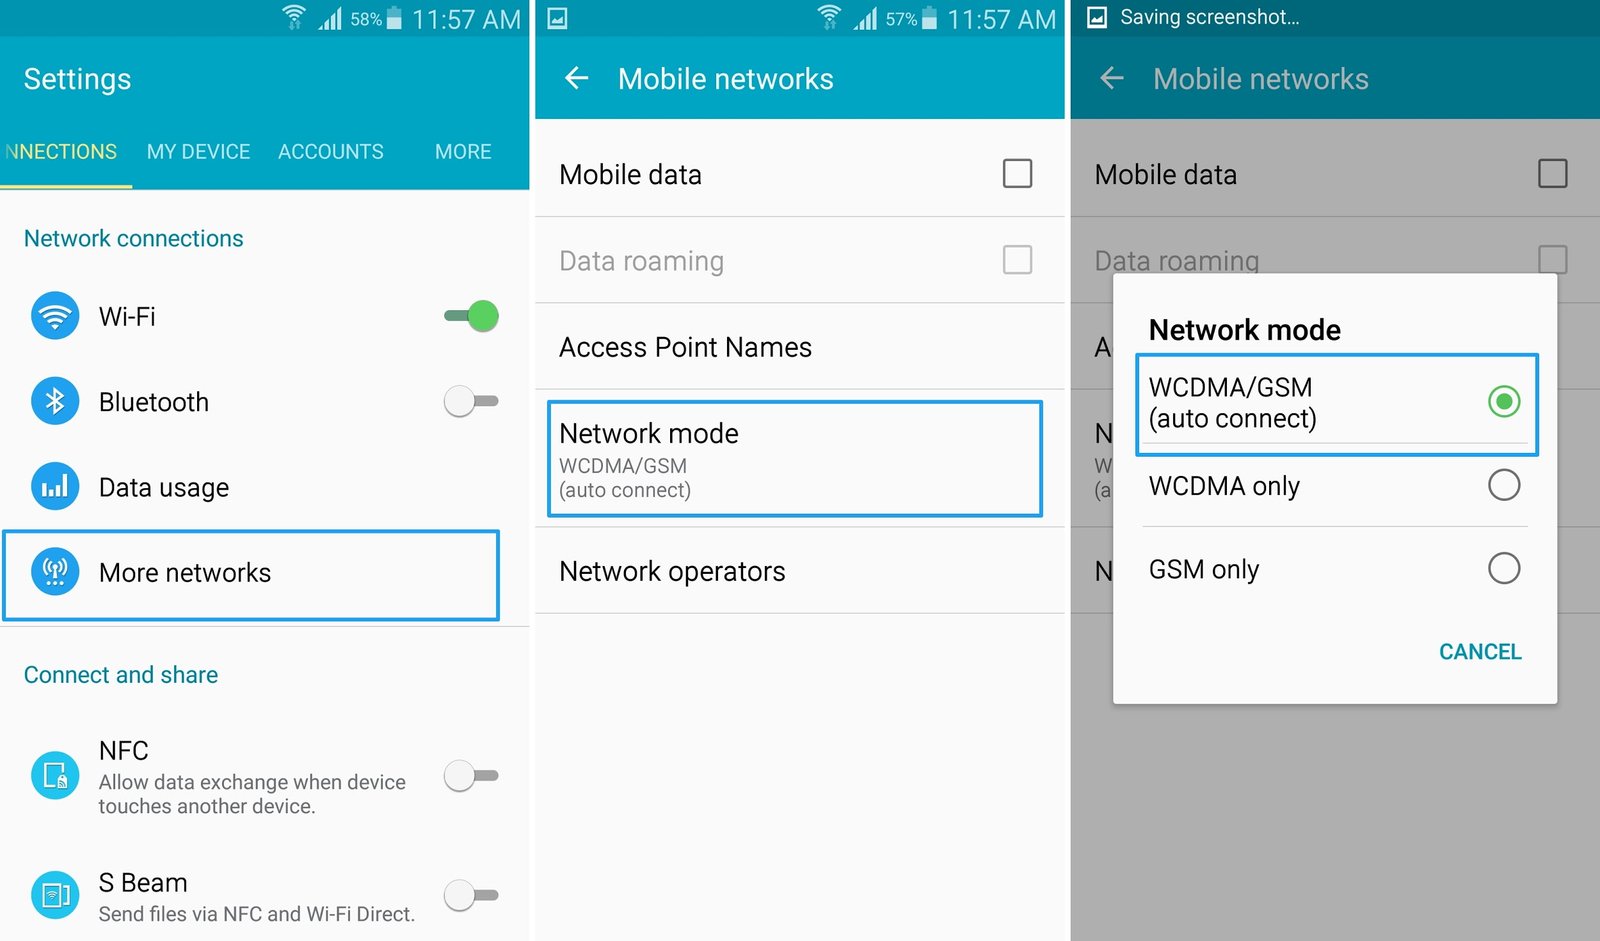
In any Android device, You can fix no network and no sim error quickly by setting Auto Network Mode on your Android device. Sometimes, If your Android device has the wrong network type selected, your Android device may not be able to connect with the right network for your SIM Card. To fix this error on your Android device, follow these steps:
For Samsung Galaxy S4

Step 1: Open “Settings” on your Samsung Galaxy S4 device
Step 2: In the settings, look for the “More Networks” option
Step 3: In the “More Network” section, you can see the “Mobile Networks” option and open it
Step 4: Tap on the “Network Mode” option and select WCDMA/GSM(Auto-Connect) mode
For Other Android devices (Android OS 5.1)

Step 1: Launch Settings app on your Android device
Step 2: In Settings, Scroll down and tap on the “Sim cards” option
Step 3: In the Sim cards section, scroll down and select “Sim.” (like “SIM1” or “SIM2”)
Step 4: Now tap on the “Preferred network type” option
Step 5: Here you have to choose the LTE/WCDMA/GSM option to solve this error
Solution 3: Using USSD Code (only for Other Android Devices)
In the other Android devices, you can solve this error using USSD code. Only you have to open Dial Pad on your phone and then type the USSD code. After typing the code, this will open a new screen called “Testing.” now follow these simple steps to fix the error on your Android device.

Step 1: Open Dial Pad on your Android phone
Step 2: Now Type this USSD *#*#4636#*#* code
Step 3: Now tap on the “Phone Information” option
Step 4: Scroll down and tap on the “TURN OFF RADIO” button (It will disable all active SIM on your Android device. Wait for 30 seconds)
Step 5: After 30 seconds, Tap on the “TURN ON RADIO” button. Now press the home button and restart your Android device.
Also, check this helpful video published by eHindi-Urdu on YouTube, which will help you understand how to follow those steps.
Solution 4: Reset Network Settings on Samsung Galaxy S4 (for S2, Galaxy S3, Galaxy S5)
This problem can be solved by Resetting Network Settings on your Samsung Galaxy S4 device. To fix to follow these steps:
Step 1: Open “Settings” on your Samsung Galaxy S4 device
Step 2: In the settings, look for the “More Networks” option
Step 3: In the “More Network” section, you can see the “Mobile Networks” option and open it
Step 4: Now you have to press the “Power” button and “Home” button for a few seconds, After 15 seconds, Your Samsung smartphone blinks with a black screen. But don’t worry about it, It is a process and safe.
Step 5: Your Samsung device will automatically restart, after a few seconds.
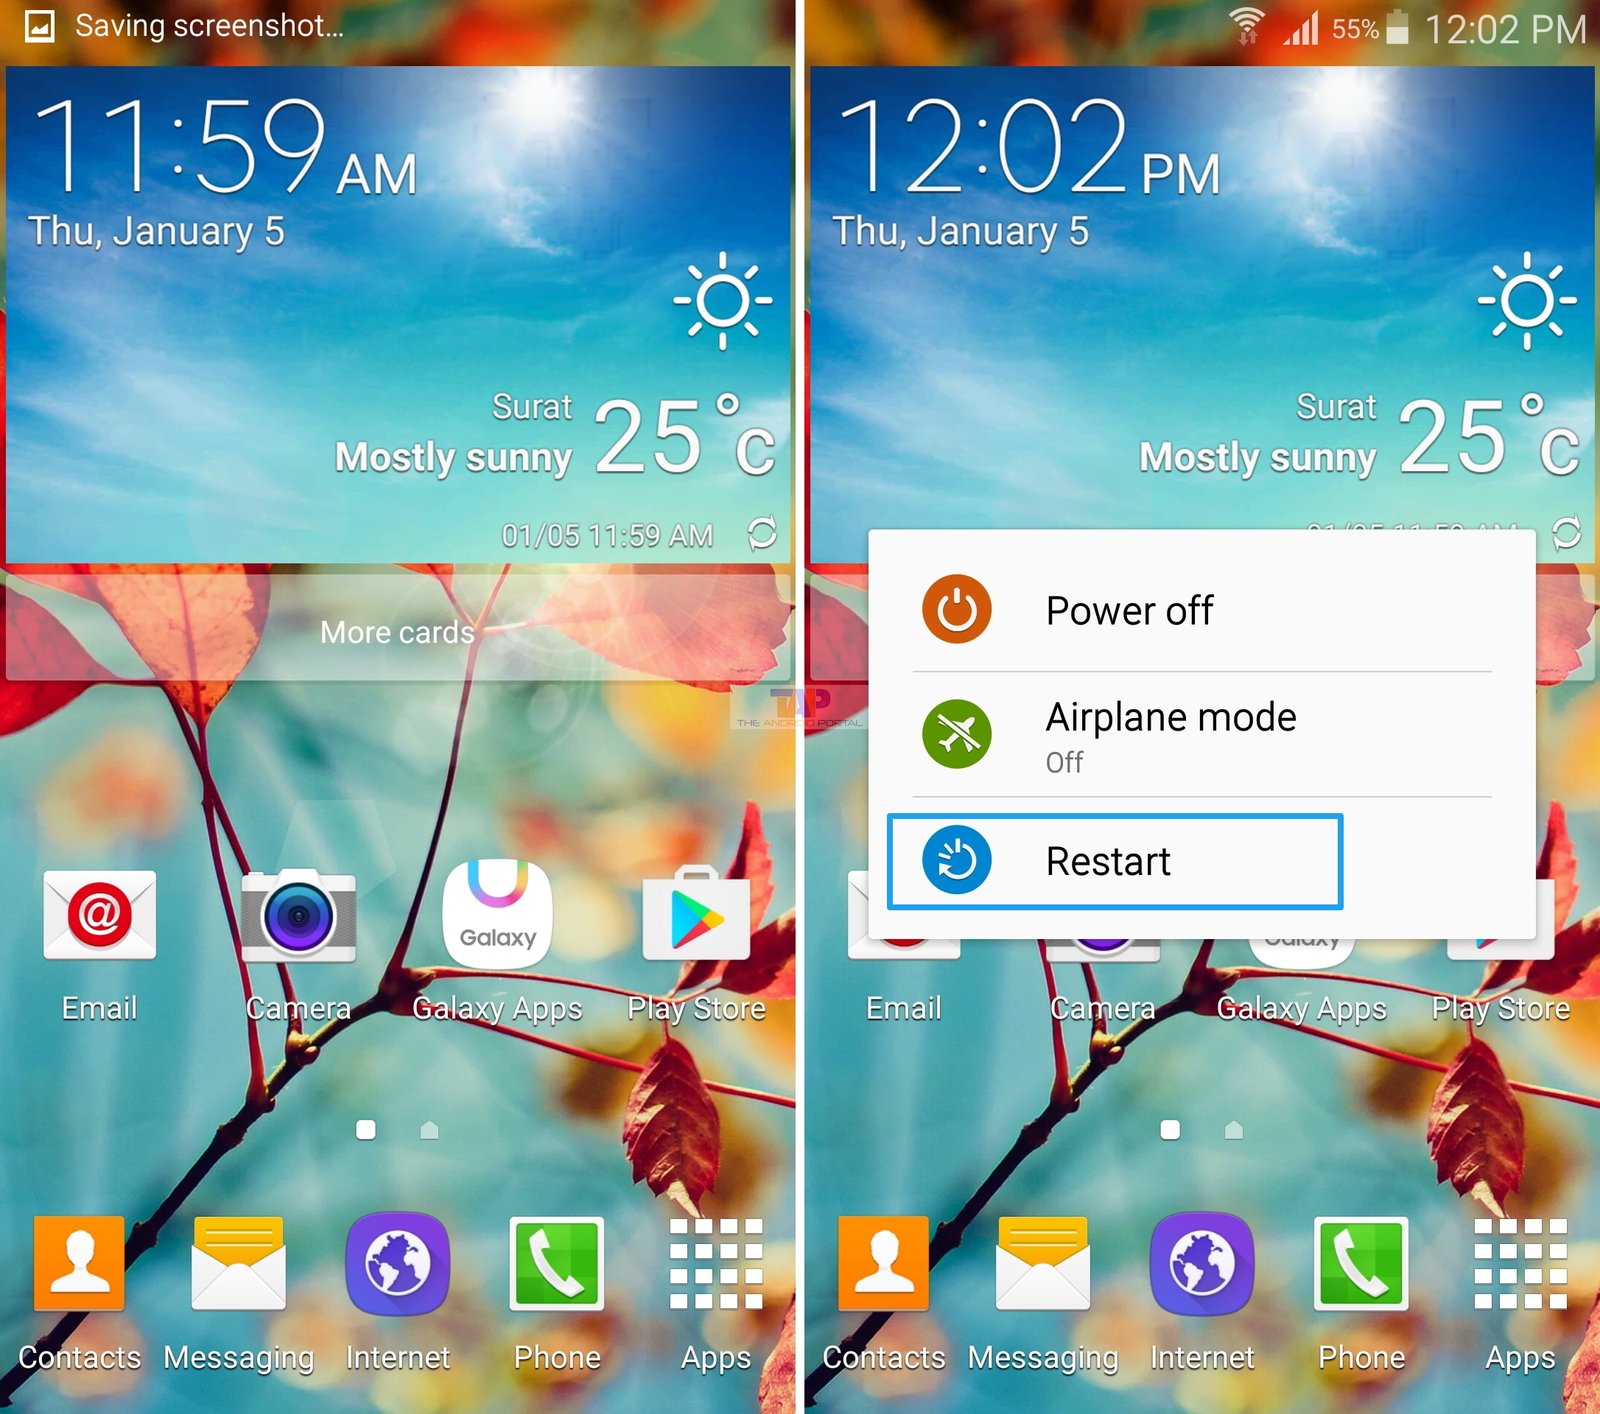
Solution 5: Restart your device
You can also solve this problem by rebooting your Android smartphone; it is the quickest and easiest way to fix this issue. When you restart your phone, it refreshes your phone and most of the applications.

After restarting your phone, try to connect to the network provider and check if your Android phone is reading the SIM or connecting to the network provider.
Solution 6: Check the SIM tray and Place the SIM securely on the tray
Switch off your Android smartphone and remove the SIM card from your Android device. Sometimes, dust particles create a problem where the SIM card comes in contact with a SIM slot. Just blow out dust from the Sim & Sim Slot. Now insert your sim card in your Android phone and start your phone.
After booting, check if it is working or not. If still not working, try using a different carrier sim card on your Android device. If the other SIM card is working properly on your device, then your SIM card is the issue.
Solution 8: Wipe Cache Partition
Sometimes this problem is solved by wiping the cache partition on your Android device. If still, you are still facing this issue on your phone so try this solution to solve no sim error on your Android device. This will erase all cached data from your Android device. Now follow these simple steps to wipe cached data on Samsung Galaxy S4 or other Android devices.
How to Wipe cache partition on Samsung Galaxy S4 (also works on S2, S3, S5)
Step 1: First, Switch off your Samsung S4 device
Step 2: After switching off, remove your phone’s battery and reinsert in your device
Step 3: Now Press and hold the Power + Home + Volume Up button at the same time
Step 4: After vibrating release the power button and keep holding the Home + Volume up button
Step 5: Wait for a few seconds, and you can see Recovery Mode on the screen
Step 6: Now use the volume up and down button to navigate up and down.
Step 7: Select the Wipe Cache partition option and press the power button to confirm it.
Step 8: Here select the Yes option using the volume down button then press the power button to confirm it
Wait for a few minutes to remove all cached data from the phone. After removing data select the reboot option using the power button to restart the device. Now, wait for a few minutes to reboot your Samsung Galaxy S4 device.
Steps to Wipe cache partition on any Android devices (Android 5.1 and above)
Step 1: Switch Off your Android smartphone
Step 2: Then remove your device’s battery and reinsert into your phone
Step 3: Now press and hold the Power + Volume down button at the same time If the above not working on your device then try below mentioned key combinations
- Press and Hold: Power + Volume Down button
- Power + Volume up button
- Power + Volume down + Volume up button
Step 4: In recovery mode, use volume rockers to navigate options
Step 5: Choose the “Wipe Cache partition” option and press power to select it. Wait for a few minutes to complete the process
Step 6: After clearing data, select the “Reboot system now” option using the power button
Wait for Rebooting your device. After reboot, check if it is working or not.
Solution 9: Reset your device to factory settings
To reset your Samsung Galaxy S4 device or other Android devices follow these simple steps. Make sure you have backed up all your data before you reset your device to the factory setting.
For Samsung Galaxy S4(also works on S2, S3, S5)

Step 1: Open “Settings” on your phone
Step 2: Swipe to the Account section and scroll down to the “Backup and Reset” option, open it.
Step 3: In the Backup and Reset, select the “Factory Data Reset” option
Step 4: Now press the “Reset” button to clear user data from the phone
Steps to reset any Android phone to the Factory setting
Step 1: Open “Settings” on your phone
Step 2: Now Scroll down and select the “Backup & Reset” option
Step 3: In the Backup and Reset, select the “Factory Data Reset” option
Step 4: Now press the “Reset” button to clear user data from the phone
This will erase all your user data from your Android device. It is recommended that you should take a backup of your data before you follow those steps. Resetting the device will delete all data from the internal memory of your device.