As we know to use Google services, the user must create an account on Google. Once you have made an account as a Google account, then you can use any Google apps and services. If you want to download any app from the Play Store, this Google account will allow you to do that. By using the same Google account, you can also use the email service of Google which is called Gmail. But sometimes, you might have faced an issue with your Android phone with a Google account. So you will get an error while downloading any apps from the Play Store. So, to resolve such an issue, here we will discuss how to change your Google account on an Android device.

How to change your Google account on Android
Here, we will be going to discuss how to change your Google Account on an Android device. In this discussion, we will mention 3 best solutions. These, two solutions are easily applicable for all the Non-rooted users of the Android device. While the remaining one is for those who have a rooted Android device. So, now take a look at the solutions and keep changing the old or unwanted Google account.
1.) By Doing a Factory Reset of the Device :
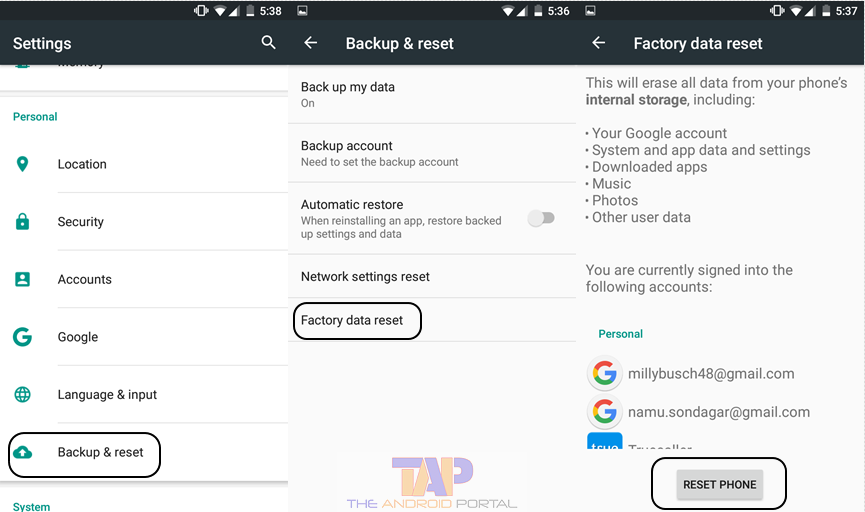
This is one of the best as well as an easy solution to do. In this solution, you have to perform a hard factory reset or data factory reset. But, keep in mind, that the factory reset will erase all the data from the internal storage of the device. To do so just follow some easy steps which are written below. This solution applies to non-rooted Android users.
- First of all, go to “Settings” from the menu of the Android device.
- After that, select the option of “Backup and Reset”, which comes under the Personal section.
- In this option, you should see the list of different options. Here, find the option of “Factory data reset“. Now, tap on it. It will prompt you. So, say YES to all the prompts. Also, click on the Reset Phone option. It may take a while.

- After the completion of the factory data reset, do not forget to reboot your Android device.
As we warned you before, the factory data reset will erase all the data. So, it will erase the data including Google account, downloaded apps, music, images, and other user data. After doing this Factory reset, your device will be set up as a new device. Now, to use any Google service through the device, make a new account.
But, some users also have a query that how to make or how to add a new account. So, for those users, here we will also mention the steps for that. By using the easy steps, you can easily add a new Google account.
- Go to the option of “Accounts” by going into the “Settings” of your Android device.
- Here, select the option of “Add account”.
- It will open a display in which the service is mentioned and in which service you want to add an account. So, here choose the option of “Google”.

- After filling in some required info which is necessary to make an account, your account will be added.
After adding the new Google account on your Android device, you can again enjoy Google Services. So if you are looking for how to change your Play Store account, this tutorial will help you to do this task.
2.) By Removing the Old Google Account and Adding A New Google Account :
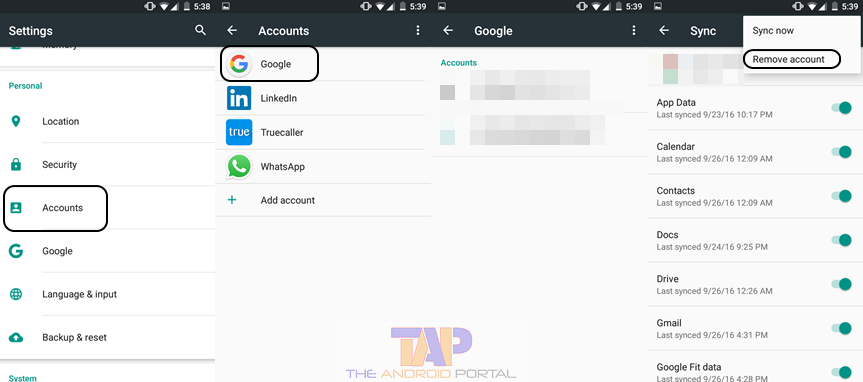
If the above solution does not work properly, then move forward with this second fix. This fix is also an easy fix to perform. In this easy and simple solution, you have to remove an existing account. To do so, follow the below steps.
- Go to the “Accounts” by going into the “Settings” of the Android-powered smart device.
- Now, tap on the option of “Google”. From here, you can delete or remove your old or existing Google account. For that, tap on the account that you want to delete.
- After that, tap on the three points at the top right corner of the screen.

- It will open a pop-up along with an option of “Remove account”. To delete that account, select it.
After removing the old account, to continue to use Google services, you have to add a new account. To do so, you have to follow the same procedure that we already mentioned in the first fix. This second fix is also easily applicable for all of the non-rooted users of the Android device.
Now, here we are going to start the third method of changing the Google account on your device.
3.) By Using an App called Root Explorer File Manager:
This is the third and final method to change the Google Account. But, remember that this fix is only applicable for those users who have a Rooted Android device. In this method, all the users must have to use an app known as ES Explorer.
So, here we are mentioning the procedure of changing the Google account by using the ES File Explorer app.
- First of all, download the ES Explorer app and install it on your rooted device.
- Open the app. If it prompts you then say Allow to it.
- Go to the option of /Data/system/.
- Now, find the file named as “accounts. db” and tap on it. After that, choose the option of Rename.
- Here, rename that file to “accounts.db.old”. It will create a backup of that file.
- Now, restart your rooted Android device.
After restarting the device, now open the file related to the Google service like Play Store or Gmail. Now, here you will be prompted to make a new account or log in to your existing account. Here, your way of making or adding a new Google Account is too clear. N0w, select the option of creating a new account. You are done. By using this trick, you can easily change your old Google account on your Rooted device.
We hope that this discussion will be very useful to you to change the Google Account on the device. We also hope that you will get an answer on How to Change Your Google Account on Android.
At a Glance
- Factory Reset your device & add another Google account
- Remove your old Google account and add a new Google account on your phone
- Use Root Explorer, delete the old account file, and add a new Google account on your phone
Do let us know in the comment, how you change your Google account on your Android. If you are facing any issues in following those steps, feel free to share your comments below.


