Google Chrome is one of the most used Web Browsers for both PC as well as Smartphone users. The name of this browser suggests that Google developed it. Also of, Google has launched other user-friendly content like Play Store, Google Drive, Google Keep, Picasa Album, YouTube, and more. Which, here we are discussing an interesting topic about the Google Chrome Browser. In Chrome, Google has also added some noticeable features that are very helpful. The Chrome Autofill Forms is also one of them. Every Google Chrome Browser for the mobile has this amazing feature of Autofill Forms.
When you associate your Google account with your device, it will automatically sync all the contents. It will sync all the data, including history, bookmarks, and all the required info. Likewise, Chrome also offers you the feature of Autofill Forms. This feature will automatically fill up the form of any site that involves specified fields like name, address, and other info. By using this feature, you do not have to fill up any form again and again. But, for that, first of all, you will have to enable or fill up the Chrome Autofill Forms feature.
Along with the form’s info, this function also allows you to fill in the info regarding the Credit Card. It makes your purchasing through Chrome too much easier. Also, it allows you to add new profiles and editing of the current info.
You can also make changes in the info on the Credit Card even after saving it once. For that, here we will also discuss some useful info regarding the Chrome Autofill Forms feature.
How to Use Chrome Autofill on Android Smartphone?
In this discussion, we will discuss enabling and disabling the process of this Chrome Autofill feature. We will also suggest to you how to add profiles and how to add a Credit Card. As we discussed ago, it would help you whenever you need to fill out the form info. But, before using this trick, make sure that Google Chrome is on your device or not.
So, now have a look at the full discussion and keep using the Chrome Browser on your Android smartphone.
How to Enable and Disable the Chrome Autofill on Android
In this process, we show you some steps to enable and disable the autofill forms on Android devices. To do so, just follow the below steps.
- First of all, launch the Menu on your smartphone.
- Open the Chrome Browser.
- After opening it, on the Home page of Chrome, tap on the top right corner. There are three vertical dot points(Option) at the upper-right corner.
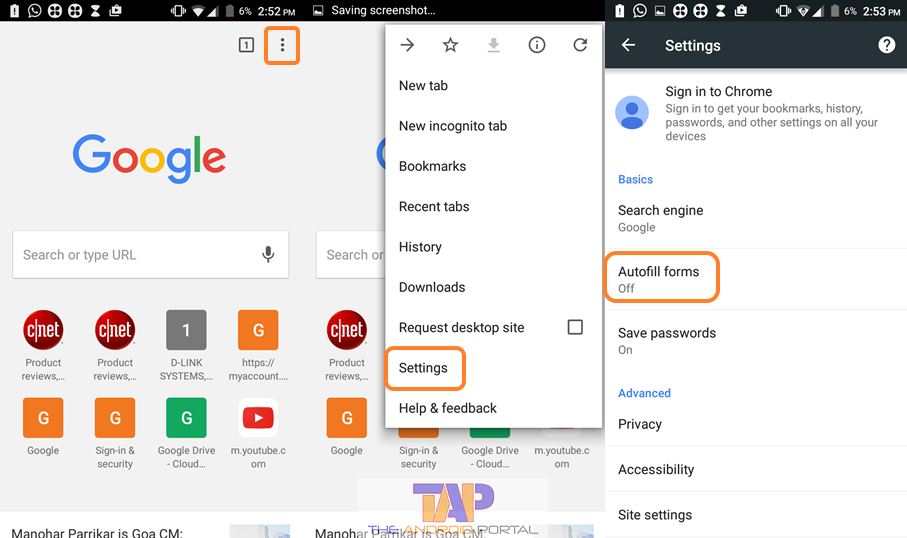
- It will open a half screen for you with some options. In, select the Settings option.
- On the next display, you should see the second option of Autofill Forms. Tap on it.
- Here, you should see an On/Off toggle.
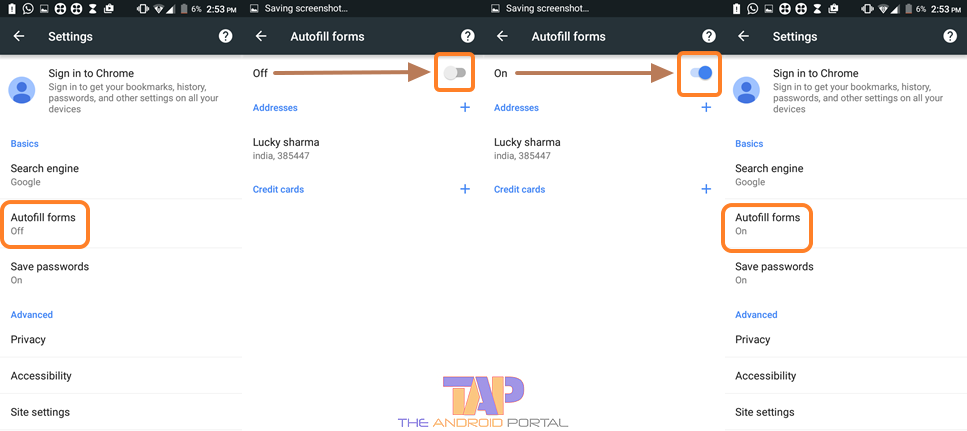
- To enable the Autofill Forms feature, just tap on the toggle. If the activation of it is succeeded, then the toggle changes its colour to blue colour.
To disable it, follow the same steps. At the end, the toggle will be converted into a White colour, which means the feature is disabled.
Now, we will move to the next process, which is regarding adding the profile to this feature.
How to Add Profile in the Chrome Autofill on Android Mobile
By using this trick, you can easily add a new profile in the Autofill Forms feature. So, to find it and add it, take a look at the below steps.
- Firstly, activate the Autofill Forms in Chrome by using the above steps.
- On the same screen, below the on/off toggle, you should see two options, Addresses, and Credit Cards.
- Here, to add a new profile, tap on the + sign, which the exactly below the toggle.
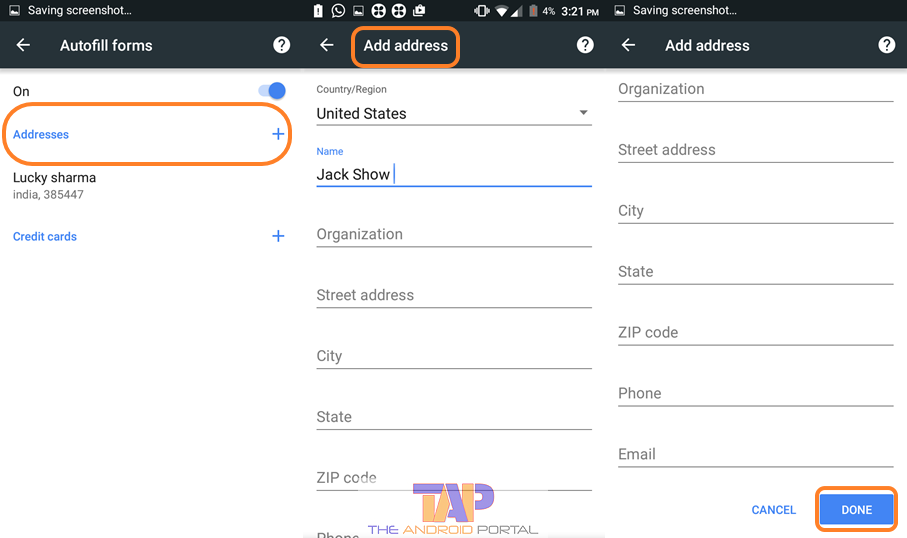
- The next display is Add Address. Here, you should see options like Country, Name, Organization, City, State, Phone, and Email to add the profile.
- After adding all this compulsory info, click on the Done button.
Now, your new profile has been successfully added.
As per the above process, now check out the steps to add a Credit Card.
How to Add Credit Card in the Chrome Autofill on Android Mobile
To go ahead with this process, make sure that the Autofill Forms option is enabled or not. If it is disabled, then make it enabled by using the first trick.
Then, add Credit Card details using the below steps.
- On the same screen, below the on/off toggle, you should see two options, Addresses, and Credit Cards.
- Here, tap on the + sign, which is in front of the option Credit Cards.
- It brings you to the next display of Add Credit Card.
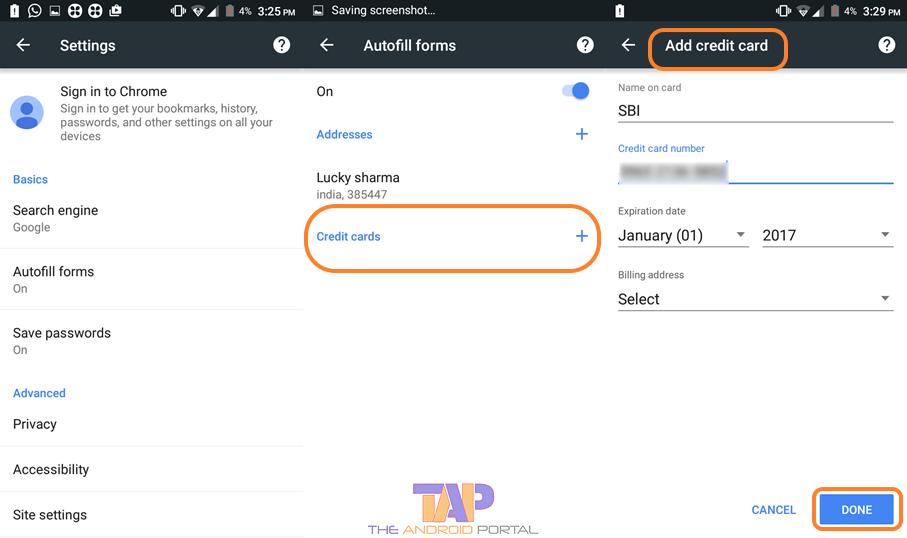
- Here, enter all the required info to add the Credit Card.
- After adding all the info, now it’s time to submit it. To do so, click on the Done option, which is in the lower right corner of the screen. Tap on it.
After that, your Credit Card details are added to your future use of it. At the time of purchasing, you do not have to enter the info that you have filled up already.
Check this Google help page for more details on this. But, you will have to enter the three-character security code that is given on the back of the card. So, this thing always keeps in mind.
How to Delete the Existing Profile in Chrome Autofill
To delete an existing profile, apply the below steps on your Android device.
- Go to the Google Chrome >> Option/Menu >> Settings >> Autofill Forms >> Enable.
- Here, tap on the profile that you want to delete permanently.
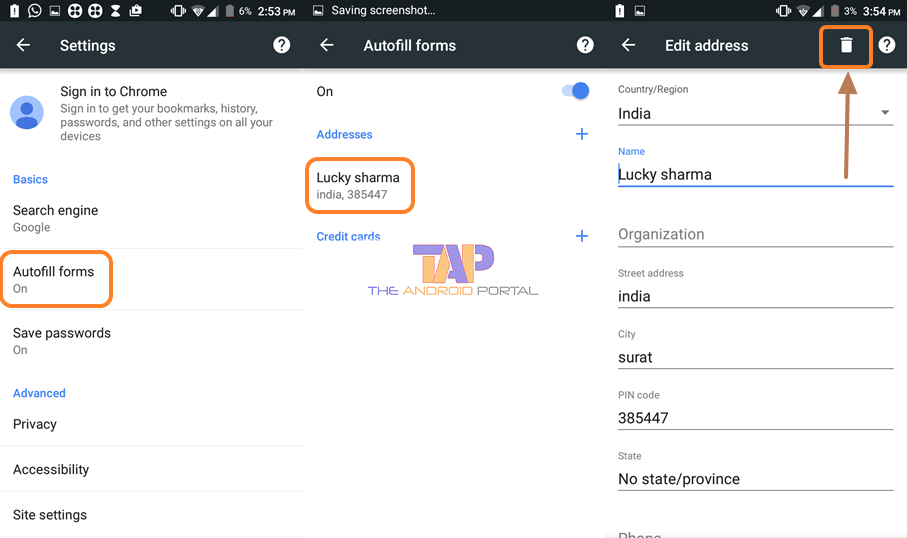
- On the next screen, you should see a Delete option. Select it to remove the profile from the Chrome Autofill forms.
You can apply the same process one by one for both Addresses and Credit Card. So, now we have finished this useful discussion regarding the Chrome Autofill feature. Both these options contain the same deleting process.
You can perform these processes as per your requirements of the use. We hope that this discussion of How to Use Chrome Autofill on Android smartphones will be very useful to you.